Do the Dip

As I stand on the doorstep to summer, waiting ever so patiently for the trees and flowers to bloom again, my thoughts turn to upcoming outdoor occasions... Whether for graduations, weddings, or just to celebrate the weekend weather, it's time to party! We all survived the winter and thawed out just in time to fire up the grill and start the festivities. The official outdoor party season is set to kickoff on Memorial Day, so the time is ripe to develop a party dish repertoire.
It's so easy to fall into a potluck rut and bring the same old thing year after year, or to fall victim to time and resort to showing up to events with a couple bags of chips. We're all short on time, especially when the weather warms, so finding time to make good party food can be tricky. The real test of the party guest is to arrive with a dish that delivers on flavor and sheer awesomeness, but to not have a meltdown in the process.
Over the years, I've learned that the trick to successful potluck dishes is to bring something that is recognizable, but with a fun (and hopefully healthy) twist. Cooking with familiar dishes mean that people are more willing to try them (which is always good) and that they can be whipped together with minimal stress. For me, that dish is hummus.
Hummus hits all the right notes at a party. Now that hummus has become pretty mainstream in America, even non-foodies will generally identify it as something that's quite tasty. Most important is the fact that it is a dip, and at outdoor gatherings, dips = good! You can stick all sorts of stuff in dips and party guests like the variety and options that dips bring.
Good hummus is really only half of the equation. In terms of health, it really does matter what you slather it on. Pita chips are the classic, sure, but I love to dip both veggies and grilled hunks of meat in hummus. Chances are, both of those items will make an appearance at the next barbeque you attend... Grilled chicken? Check! Raw veggie platter? Check! Do yourself a favor and skip the creamy goop that comes with the veggies and give them some hummus love instead.
As with all trendy dishes, there are a lot of really awful store-bought versions of hummus available. Not only are pre-processed tubs of hummus loaded with preservatives and sodium, but they are pretty gross compared to homemade... not to mention expensive! Making hummus from scratch may be one of the cheapest dishes to prepare, especially in party-sized quantities.
The great thing about hummus is that it is completely versatile... it can be made from any kind of cooked bean and flavored in a million different ways, so you can prepare basically the same dish all summer, but it can taste and look different every time, depending on the creative juices that went into it. Real deal hummus is made of chickpeas, garlic, lemon, and tahini (Middle Eastern sesame seed paste - available in the ethnic aisle in any decent grocery store). That's it. That is also where the fun begins. Hummus is crazy good made with white beans (especially when loading up on the garlic) and black beans, kidney beans, and in one of my favorite variations, with green peas.
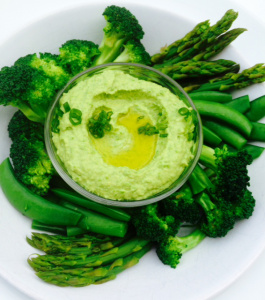
Admittedly, standard hummus is not the most appetizing looking dish in the world. It is a mound of beige sludge, really. It is indeed a delicious mound, but not a very pretty one. I love to substitute some of the classic chickpeas with green peas to make it burst with springtime color. We feast first with our eyes, so why not give them something gorgeous as well as delectable.
Green Pea Hummus
Makes about 2 cups
1 1/2 c frozen peas
1/2 c canned chickpeas, do not drain off liquid
1 clove of garlic (although more wouldn't be terrible!)
2 Tbsp tahini
2 Tbsp lemon juice (from about 1/2 a lemon)
pinch of salt
2 ice cubes
In a small saucepan, heat the peas with the chickpeas and their liquid just until the peas are thawed (3-4 minutes) - warming the chickpeas will also give a smoother hummus
- Set aside the peas and chickpeas to cool slightly
- In a food processor, blitz up the garlic, tahini, lemon juice and salt (it will make a clumpy goo - scrape the sides, process again, and repeat a few times to make sure the garlic is no longer in big chunks)
- Use a slotted spoon to add the peas and chickpeas to the machine (save the liquid in the pan - you will probably need it)
- Add the ice cubes (they help the hummus to emulsify and prevent the machine from overheating) and process until smooth-ish - be sure to stop and scrape down the sides at least once
- Add the chickpea liquid, a tablespoon at a time, while the machine is processing to help smooth out the hummus (this will probably take 3-4 minutes)
- When nice and smooth, taste the hummus, add more salt if necessary, and scrape into a serving bowl
- Chill until service, then dip away!
***Hummus improves greatly with a few hours rest in the fridge. This also makes it a perfect make ahead dish! It can be made up to 4 days in advance.
***Experiment with other cooked beans instead of the peas and chickpeas - the ratios and other ingredients will be the same.
***Of course, this dish is fabulous with only chickpeas... use a full 2 cups of chickpeas, about 2 15-ounce cans.
***I love the monochromatic effect of serving green hummus with green veggies, but any sliced peppers, radishes, cauliflower, or carrots will also be delicious as dippers.
Traditionally, hummus recipes do not contain oil. Adding oil while the mixture is processing will give it a weird, curdled texture. The oil should only be drizzled over the top of the finished dish, right before the dipping commences. I am a traditionalist at heart, so I always recommend this final flourish of oil -- extra virgin olive oil only please.
Happy Eating!
Jackie